Record, Transfer, Enjoy. Neuros MPEG4 Recorder 2: The Ultimate Video iPod Accessory
In the following step-by-step instructions, you’ll discover how to use
the Neuros MPEG-4 Recorder 2 to capture and transfer video onto your iPod.
Record
1. Set up the R2
Plug it in, connect it to your TV, power it on and do all the great set-up things
you’ve read about in your owners manual.(see here for more detail) The R2 pretty much records
from any device that produces a video signal out of a yellow-red-white set
of RCA plugs. If you need to connect a male RCA connector, like from a PS2 or xBox, to the R2, you can simply use a double-female RCA connector, like the one here. Got a VCR, DVD player, cable box or TiVo? The R2 can capture
video from any of these. Do you have a secret network of video security cameras?
(Hey, who are we to judge?) The R2 can connect to these, too. In a nutshell,
if you've got a set of RCA plugs that output a video signal, the R2 will digitize it.
2. Insert a memory card
The R2 works with both Compact Flash and Memory Stick Duo cards. Video takes
up quite a bit of space. A large capacity (say, 512MB or 1GB) card gives you
plenty of room to store several hours of video. Gently but firmly insert your
memory card into the slot in the front of your R2 unit.
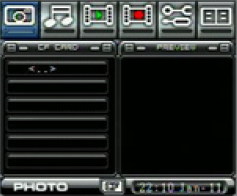
3. Load the Main Menu
If you are not already at the main menu display, press Home on your remote. The
main menu consists of 6 icons, displayed in a row at the top of your screen.
It looks like this.
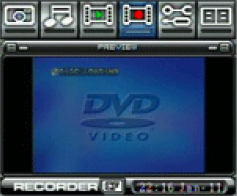
4. Select the Recorder
Move the menu selector to Recorder (the film clip with a red dot inside) by pressing
and .
When selected, a live preview appears below the menu line. It shows you whatever
video is playing on the device you’ve connected to your R2.
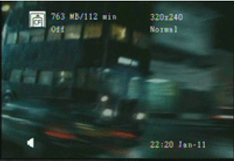
5. Enter the full-screen live preview
Press enter . The live preview goes full screen as the main menu hides. You should be able to see and hear the video as it plays.
Notice the writing at the top of the screen. It’s important. If you don’t see it, press the display button .
The top-left corner indicates the kind of card inserted (in this case, a compact flash card), the amount of free memory on the card and the number of minutes you can record at the current settings. Here, there’s just over 750 MB to spare on this CF card—plenty of room to record nearly two hours of video at these settings.
The top-right corner shows you what those settings are, in this case 320x240 pixel video at “Normal” quality. These are the proper settings for recording iPod video. If your settings are okay, skip to step 11, otherwise continue on. The next few steps walk you through the settings adjustment procedure.
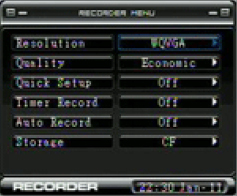
6. Open the Recorder Menu
While in the full-screen preview, press the menu button on
the remote. The Recorder Menu options open, cutting off the live preview.
(The sound and video will stop playback.)
This menu consists of two columns. The first, which you cannot select or do
anything to, identifies the name of each option. The second lets you adjust
its value. Notice the light blue rectangle that surrounds the selected setting.
7. Set the Resolution
Use the and
buttons to move the blue selection to the Resolution row. Then, use
and to choose the QVGA option. (Other options are WQVGA and TV VGA). QVGA records at 320 by 240 pixels, which is perfect for your 5G video iPod.
8. Set the Quality
Move down to the Quality row and select the Normal quality option. Although
your iPod can play back both Economy and Normal video, Normal produces better
quality and more watchable results.
9. Return to the full screen live preview
Press to exit the recorder menu and return to the live preview. You should once again be able to see
and hear your video.
10. Check your settings
Press display to bring back the overlay text you saw in step 5. Confirm that
the top-right corner says both 320x240 and Normal. That "Off" in
the upper left corner? It means you are not yet recording video.
11. Queue up your video
Adjust your video source (by rewinding, etc) so it’s ready to begin
from the start of the sequence you want to record.
12. Record!
Here’s where you need to be quick. Start playback and then press record
. The text in the upper-right
of the screen changes. A red recording indicator appears at the top-right
corner of your screen just underneath the name of the new video file.
13. Let your video play through
Watch and wait as the R2 does it job and your video records to your memory
card. After it plays through, press record
again to finish recording.
14. Return to the main menu
After recording, press on your remote to leave the recording session and return
to the main menu.
Transfer
1. Place your memory card in your computer
After you finish recording and return to the main menu, gently remove the
memory card from your R2 and insert it into the card reader on your personal
computer. It will mount as a new drive.
2. Find the movie file
Open the new drive window. In Windows, access it from My Computer. In OS X,
you can reach it from your desktop. Navigate down to the MP_ROOT folder and
then to the 101MNV01 inside it. Inside this subfolder you’ll find your
newly recorded video. Each one’s named M4V followed by a number, like
you saw in step 11 (e.g. M4V00003.MP4). Just ignore the THM files.
3. Launch iTunes
Dock your iPod and launch iTunes. iTunes detects your iPod and places it in
the source column at the left of the screen.
4. Drag your video file onto the iPod
You can either drop the video file on the iTunes iPod icon or you can select
the iPod and drop the file into the iPod’s playlist.
5. Wait
It may take several minutes for your video file to fully transfer.
Rename. (Optional) Unless you’re cool with videos named “M4V00003”,
this is a great time to rename your video file in your iPod’s playlist.
Select the video, wait a second, click the name again and then edit it as
desired.
6. Rename
(Optional) Unless you’re cool with videos named “M4V00003”,
this is a great time to rename your video file in your iPod’s playlist.
Select the video, wait a second, click the name again and then edit it as
desired.
Enjoy!
The only thing left for you to do is to watch. Eject your iPod, plug in your
headphones and find a comfortable place. You’ll find your new video
in the iPod’s Videos > Movies section. It will be listed alphabetically
among your other video selections. Select it, play and kick back. Cool, huh?
In this article, you’ve discovered how to use the Neuros MPEG-4 Recorder
2 to record videos for your iPod. The step-by-step instructions walked you
through the process of setting up your recorder, capturing your video and
putting it onto your iPod. As you’ve seen, it’s not rocket science,
it’s not neurosurgery, it’s just fun. The moral of the story?
You can take it with you. So why don’t you? If you’ve got an 5G
video iPod, don’t you need an R2?